 |
 |
|---|---|
| Ex 5.4: Use CellPose in QuPath | • |
5. Cells detection
5.5 Use InstanSeg in QuPath
InstanSeg is the last deep-learning architecture that we will cover. It is also maid for bloboid objects, but the models shipped by default with the plugin are limited to nuclei (IHC RGB, IHC deconvolued and fluo).
The pixel size is mandatory for this architecture because rescaling is performed automatically.
The InstanSeg plugin in QuPath doesn't handle cells simulation by performing an expansion!
Note
Keep this project clean, we will reuse it later.
5.5.1 Count nuclei in kidney biopsies
Goals:
- We want to count the number of nuclei in the same kidney biopsies as the one you worked in Ex: 4.1.1 Glomerulus-to-kidney ratio.
- We want to launch the segmentation only in the areas of kidney, excluding the areas of glomerulus.
- To do so, we will:
- create a pixel classifier to roughly find the tissue
- use a script to import the polygons of glomerulus
- find a way to remove the glomerulus polygons from the kidney
- run InstanSeg in the left over kidney tissue
Required data:
| Folder | Description | Location | License |
|---|---|---|---|
| Histology (PAS-HE-IHC) | H-DAB images of kidneys into which glomerulus are visible and lungs into which alveolus are present | DOI: 10.1038/s41467-023-40291-0 | MIT |
A. Locate the kidney tissue
- We want to create a rough polygon around the kidney tissue.
- To do that, we will create a thresholder.
- If you don't remember the procedure, you can find it in the Ex 4.2.1: Compactness of lung per image.
- The annotations around kidneys should use the
Kidneyclass. - You can apply the classifier to the whole project, and save the project.
B. Recover areas of glomerulus
- If you are reusing the project that you created for Ex 4.1.1: Glomerulus-to-kidney ratio and already have glomerulus annotations, it is perfect, you can jump to the part C.
- Otherwise, you need to import the glomerulus polygons for each image.
- These images were annotated by pathologists and we have the ground-truth polygons corresponding to the areas of glomerulus. We created the
 "unpack annotations.groovy" script to automatically import the correct polygons in the opened image.
 - Simply open it as a new script and run it for the whole project.
- At this point, you should have for each image:
- a polygon of
Kidney - N polygons of
Glomerulus
- a polygon of
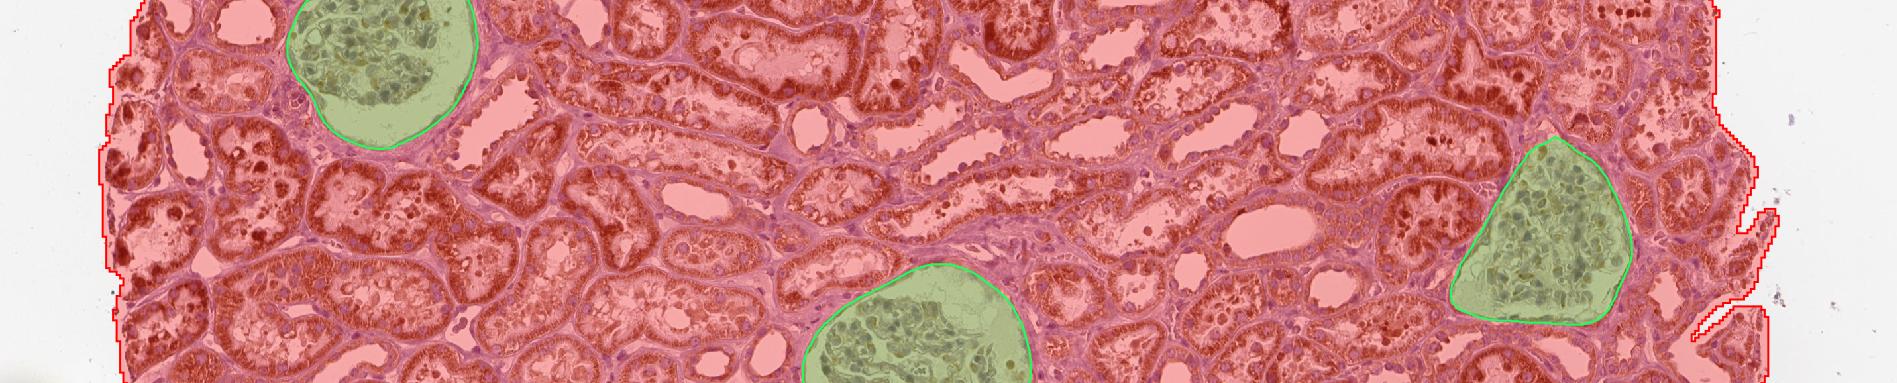
C. Remove glomerulus from kidney
a. On one image
- For the later steps, we will need to provide the pixel size for our images. To do so:
- go to the "Image" tab (alongside the "Annotations", "Workflow", ... tabs)
- make sure that no annotation is active in the viewer
- the pixel width and height should be unset (in red)
- by double-clicking on either fields, you can set them both manually to 0.4970µm.
- Each area is now clearly defined but we still need to remove the polygons of glomerulus from the kidney polygon.
- We are going to use the boolean operations that QuPath allows to perform on annotations. We will launch them from the interface but unfortunately, they are not recorded in the "Workflow" tab in QuPath current version
¯\_(ツ)_/¯. - For this reason, when the batch time will come, the required code will be provided.
- First of all, we will merge together all the annotations corresponding to glomerulus.
- You can do that by right-clicking on the
Glomerulusclass in your class list and using "Select objects by classification". - Once all the annotations are active, use the
 "more options" button below the list of annotations and in the "Edit multiple annotations" category, choose "Merge selected".
 - Now, we will dilate the polygons to make sure that we remove everything inside or touching the glomerulus.
- In the top-bar menu, go to "Objects" > "Annotations" > "Expand annotations...".
- Set the radius to something low (like 10µm)
- Uncheck "Remove interior" and "Constraint to parent"
- Launch the expansion
- Close the expansion settings and before clicking anywhere, while the original objects are active, click on "Delete" below the annotations list to keep only the expanded objects.
- The last step consists in:
- in the list of annotations, click first on the glomerulus annotation
- then do a shift click on the kidney annotation
- in the "more options" menu below the annotations, in "Edit multiple annotations", use the "Subtract selected" function.
b. In the whole project
- Start by turning your commands history into a script from the "Workflow" tab.
- The few first steps are present in the script, keep the lines that:
- select all glomerulus annotations
- merge the selected annotations
- run the execution of the dilation plugin
- remove selected objects
- Remove everything beside these instructions.
- We are still missing a quite important part: the removal of glomerulus polygons. As told before, this instruction is not recorded in the history yet, so you will have to copy and paste a little snippet of code to perform it.
- The "subtract_rois.groovy" script is available. You can copy and paste its content before everything in your script. Why before? Because this script only contains a function (≈ a template of code) and while we don't use the function, the process is not performed.
- Here, the function is called
subtract, and you can see that it needs three things (aka "parameters") to work:classToSubtract: the classification of the annotations corresponding to "B" if we want to do "A - B".classMain: the classification of the annotations corresponding to "A" if we want to do "A - B".removeOriginal: a boolean (true or false) to determine whether you want to remove the objects "A" and "B" to keep only the result.
- To use the function and actually perform the removal of glomerulus polygons:
- At the end of the script, where the subtraction should happen, copy and paste
subtract(classToSubtract, classMain, removeOriginal)(== the signature of the function). - replace
classToSubtractby"Glomerulus"(quotes included). - replace
classMainby"Kidney"(quotes included). - replace
removeOriginalbytruebecause we only want to keep the result.
- At the end of the script, where the subtraction should happen, copy and paste
- You should now have a script looking like that:
def subtract(classToSubtract, classMain, removeOriginal) {
    def annoMain = getAnnotationObjects().find{it.getPathClass() == getPathClass(classMain)}
    def annoToSubtract = getAnnotationObjects().findAll{it.getPathClass() == getPathClass(classToSubtract)}

    def roiMain = annoMain.getROI()
    def roisToSubtract = RoiTools.union(annoToSubtract.collect{it.getROI()})

    def subtractedROI = RoiTools.combineROIs(roiMain, roisToSubtract, RoiTools.CombineOp.SUBTRACT)
    def subtractedObj = PathObjects.createAnnotationObject(subtractedROI, annoMain.getPathClass())
    addObject(subtractedObj)

    if (removeOriginal) {
        QP.removeObjects(annoMain)
        QP.removeObjects(annoToSubtract)
    }
}

setPixelSizeMicrons(0.4970, 0.4970)
selectObjectsByClassification("Glomerulus")
mergeSelectedAnnotations()
runPlugin('qupath.lib.plugins.objects.DilateAnnotationPlugin', '{"radiusMicrons":10.0,"lineCap":"ROUND","removeInterior":false,"constrainToParent":false}')
removeSelectedObjects()
subtract("Glomerulus", "Kidney", true)
Note
In the upcoming step, you will perform measurements of shape and intensities within nuclei: if you didn't do the color deconvolution, you should do it (and apply it to the whole project) right now.
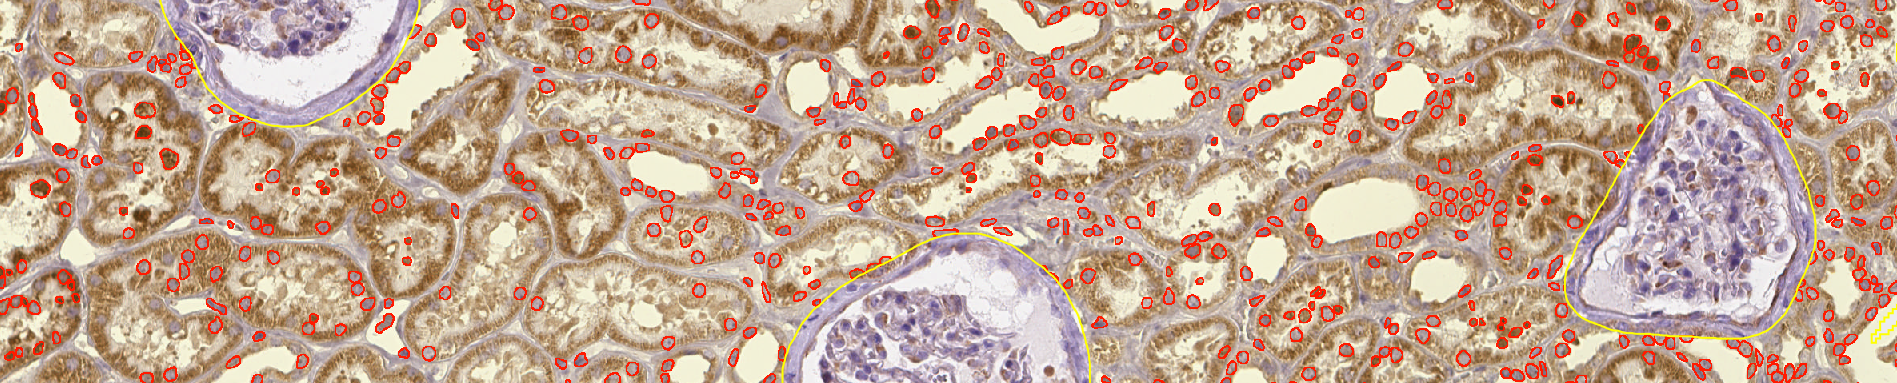
D. Run InstanSeg
a. On one image
- If you installed InstanSeg as described in the requirements, you should find it in the top-menu bar, in the "Extensions" menu.
- In there, you should have only one feature called "Run InstanSeg". Launch it to display segmentation settings.
- The first time that you will launch InstanSeg, you will have to provide a path for a folder into which the models will be saved. To do that:
- Using the
 "choose path" button, either choose to use the default path (recommended) or use a custom path.
 - Then, in the dropdown menu, select the "brightfield-nuclei" model: it's the one to use for RGB images.
- Eventually, click on the
 "download" button to launch the downloading of the model.
- Using the
- Once it is over, it is time to use our newly downloaded model.
- In the "Input channels", make sure that the R, G and B channels are being used.
- In the "Output type", use some detections.
- For the next chapter sake, make sure that the "Make measurements" option is activated.
- Select the kidney annotations by doing a right-click on the
Kidneyclass in the class list and using "Select objects by classification". - If everything is set, feel free to run the segmentation.
- Take a closer look at the segmented nuclei in the regions close of kidney boundaries. Do you see that some cells are being cut? To address that problem, you can (still with the
Kidneyannotation active) go in the top-bar menu and use "Objects" > "Delete" > "Delete objects touching selected ROI bounds".
b. For the project
- In the "Workflow" tab, convert your commands history into a script.
- In here, two things are going to be interesting for us:
- the selection of objects by
Kidneyclassification - the instanciation of the InstanSeg object (on several lines)
- the removal of the nuclei touching the border
- the selection of objects by
- You should be left with a script looking like this:
selectObjectsByClassification("Kidney")
qupath.ext.instanseg.core.InstanSeg.builder()
    .modelPath("/home/clement/QuPath/v0.6/instanseg/downloaded/brightfield_nuclei-0.1.1")
    .device("gpu0")
    .inputChannels([ColorTransforms.createChannelExtractor("Red"), ColorTransforms.createChannelExtractor("Green"), ColorTransforms.createChannelExtractor("Blue")])
    .outputChannels()
    .tileDims(512)
    .interTilePadding(32)
    .nThreads(4)
    .makeMeasurements(true)
    .randomColors(false)
    .outputType("Detections")
    .build()
    .detectObjects()
removeChildObjectsTouchingSelectedBounds(PathObjectFilter.DETECTIONS_ALL)
- You can run it for all the images, except the one you already processed.
E. Export measurements
- If you save your project, you should be good to export your measurements to a TSV.
- Our problematic simply consisted in counting nuclei and this information is held by annotations.
- If you want to see the properties of individual nuclei instead, export by detection.