 |
 |
 |
|---|---|---|
| Ex 4.1: Fully manual segmentation | • | Ex 4.3: Use a N-classes pixel classifier |
4. Tissue segmentation and classification
4.2 Threshold-based tissue segmentation
As we concluded from the last exercise, segmenting objects manually has many downsides (time consuming, user dependent, ...). From this point, we will use pixel classifiers to automatically find our objects.
The most basic pixel classifier is a threshold. It only offers two classes into which each pixel can fall (positive/negative, object/background, true/false, ...)
As we will see in the following exercises, the thresholding can be performed:
- on the raw image
- on a "virtual" channel (min/max of RGB, deconvoluted colors, ...)
- on a version of the image filtered on the fly
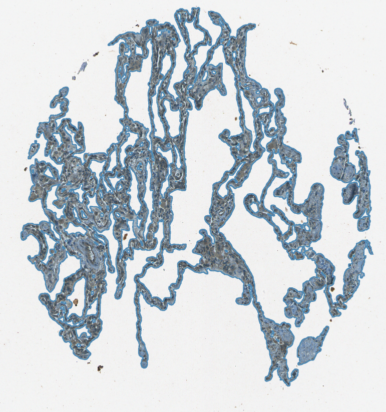
4.2.1 Solidity of lung biopsy per image
Goals:
- The goal of this exercise is to process the solidity of the lung tissue on each image.
- To do so, you will need to:
- Find the polygon corresponding to the whole lung tissue and give it the
Lungclassification. - Use the workflow recorder to apply the classifier and find the lung tissue on all your images.
- Use the script to convert a set of polygons into a convex hull, and give the
Hullclassification to this new polygon. - Export the measurements to a TSV so you can process the solidity per image in a spread sheet software.
- Find the polygon corresponding to the whole lung tissue and give it the
Required data:
| Folder | Description | Location | License |
|---|---|---|---|
| Histology (PAS-HE-IHC) | H-DAB images of lungs into which glomerulus are visible and lungs into which alveolus are present | DOI: 10.1038/s41467-023-40291-0 | MIT |
What is solidity
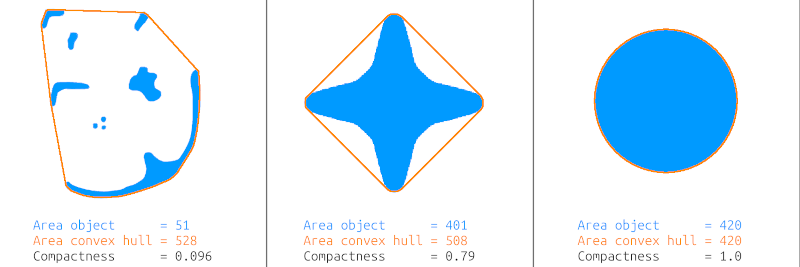
- We define the solidity as the ratio of the object's area over its convex hull area.
- If you imagine that you carved your object out of a block of wood, you can imagine the convex hull as what you would get if you wrapped an elastic band around it.
- On the image below, the object is blue, the convex hull is the orange polygon.
- The solidity is a ratio going from 0.0 for very sparse objects to 1.0 for solid blocks.
- In our exercise, a high solidity will imply the presence of dense tissue while a low solidity means that most of the biopsy is alveola.
A. Locate the lungs tissue
- Before starting this step, make sure that you have the
Lungclass available in your class list. - In the top-bar menu, go to "Classify" > "Pixel classification" > "Create thresholder..."
- You must now set the correct settings for your thresholder:
- Resolution: We will need the live preview to choose the correct resolution, so just set it to "Moderate" as a starting point.
- Channel: We want the whole object (not only the nuclei or the DAB areas) so we want to use as much signal as we possibly can. We are looking at a transmission image which means that we see white light as it passes through our object. Where there is nothing, we should observe solid white (or a very light color). Where the object is, the intensity of a channel (R, G or B) is necessarily lower than the background. So we will choose "Min channels" that simply takes the minimum of R, G and B for every pixel.
- Prefilter: If you take a closer look at the image, you will notice small gaps between nuclei. You will also notice that all nuclei don't necessarily have the same intensity. To smooth everything and get a mask without holes, we will try to use a Gaussian blur as prefilter.
- Smoothing sigma: This applies to the prefilter. If you leave this parameter to 0, the prefilter won't be applied. You can start with a radius of 1, and we will adjust it when we will have a preview.
- Threshold: Values in your images range from 0 to 255, so you can start at 128 and we will adjust it when you will have a preview.
- Above threshold: It is the class that will be given to the pixels above the threshold. As we said before, high values correspond to the background when you work on transmited light. So we will set to
Ignore*. - Below threshold: We are working on lung biopsies, so we will set that parameter to
Lung.
- From the moment you provided an above and a below class, you should have a live preview on your image.
- If you don't see anything, make sure that the
 preview is not deactivated, or that the slider right beside it is not at its minimum.
 - What you can change:
- If you estimate that the mask you see is too "blocky" (pixels too big), you can pass your resolution to "High" for example.
- If the mask is missing too many pixels, increase your threshold
- If playing with the threshold results in too much noise being caught in the mask, you can increase the sigma of your Gaussian blur.
- Once you are happy with what you see, give your classifier a name ("find-lung" for example), press "Save" and close the "Create thresholder" window.
Warning
A threshold is based on the intensity of pixels. If you acquire some new images with another microscope or with a variation of your protocol resulting in darker/lighter images, you will have to make a new version of your thresholder!
B. Find the lung tissue in all your images
a. Apply the classifier to an image
- You just created a thresholder, and you would like to apply it to every image in your project without having to visit each of them.
- Start by going to "Classify" > "Pixel classification" > "Load pixel classifier...".
- In the list that appears, you should find the pixel classifier that we just created (that we named "find-lung").
- You can leave the region to "Everywhere" to apply the classifier to the whole image.
- You can now launch the creation of objects on the full image.
- You want to create annotations, not detections.
- To remove small debris, you can try to set the minimum object size to something else than 0 (2000 for example).
b. Apply the classifier to the whole project
- Under the buttons for annotation tools, right above the class list, you should find a "Workflow" tab.
- The upper part contains the command history of everything you made on this image.
- In the lower part, you can click on the "Create script" button that will transform your command history into a script.
- Our single goal for this step is to apply the pixel classifier to the whole project.
- If you read the different lines of code, you shoud see one containing
createAnnotationsFromPixelClassifierand a reference to your pixel classifier"find-lung". The first number corresponds to the minimal object size and the second corresponds to the minimum hole size. You can erase everything in this script except the line we just talked about. - You should have a script containing this single line.
- If you go to the
 "more options" menu next to the "Run" button, the first option should be "Run for project".
 - In the window that shows up, transfer all your lung images to the right column, except for the one you have been working on so far. You can now press "OK" to launch the script on each image of the project.
C. Find the convex hull
- There is no way to calculate the convex hull in QuPath from the interface, you will have to use a script!
- You can find the "make-convex-hull.groovy" script in scripts/tissue-segmentation-classification.
- You still have one task left before being able to run it: complete the input and output classes.
- The input class is the class given to the annotations from which we want to calculate the convex hull.
- The output class is the class that will be given to the new annotation that will be created to represent the convex hull.
- Once you completed both classes, you can launch the script for the whole project. Don't forget to save at the end of the run.
Tip
If you often use the same scripts, place them in your user directory ("Automate" > "User scripts..." > "Open script directory") so you don't have to re-open them from a folder every time you need them. Once you did that, they will simply show up in the "Automate" > "User scripts..." menu.
D. Export and process the ratio
- Make sure that you saved your project (
 +
+ ) before starting this step.
 - If you click on any polygon from your annotations list, you should notice an
Area px^2property. - In the top-bar menu, go to "Measure" > "Export measurements".
- In the list of images, transfer to the right column every image onto which you drew polygons.
- Choose a path for your TSV file. Keep it named
measurements.tsvand leave it in the project's folder. - The "Export type" indicates where the useful information is located. In our case, we want the areas, and we saw that they are present in annotations.
Warning
If you don't save your project after you made polygons on the last image, they won't be exported in the final results even if the polygons are visible.
E. In LibreOffice Calc
- If you open the produced TSV in your spread sheet software, you should notice that you have:
- Two consecutive lines for each image (column "Image")
- One with the
Lungclass and the other withHull(column "Classification") - The area for each one of them (column "Area px^2")
- If you want to make the file clearer to read, you can remove useless columns (Object ID, Parent, ...)
- Create a new column that will contain the solidity (ex: "Solidity")
- Write the expression to divide the
Lungarea by theHullarea and apply it to all images. - Optionally, pass the formatting of the column to percentage ("Format" > "Number format" > "Percentage")
