 |
 |
|---|---|
| • | Ex 4.2: Threshold-based pixel classifier |
4. Tissue segmentation and classification
4.1 Fully manual tissue segmentation
The most basic way to locate your objects is to create the polygons by yourself...
As you may expect, this approach is time-consuming, user dependend and becomes nearly impossible depending on what you need to find. This technique can be used whether you need to locate your objects of interest, or sub-areas within them.
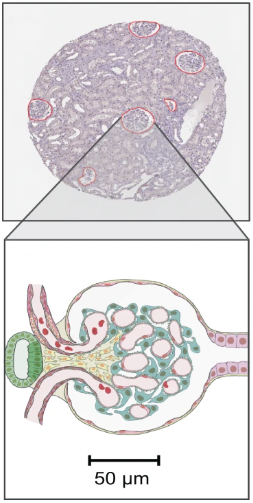
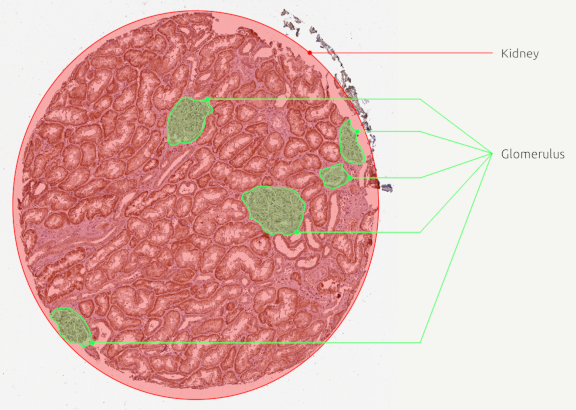
4.1.1 Glomerulus-to-kidney ratio
Goals:
- The goal of this exercise is to process the glomerulus-to-kidney ratio for all images.
- To do so, you will need to:
- Find the polygon corresponding to the whole kidney biopsy and give it the
Kidneyclassification. - Find the set of polygons representing glomeruli and give them the
Glomerulusclassification. - Repeat these steps on two or three images.
- Export the measurements to a TSV so you can process the ratio per image in a spread sheet software.
- Find the polygon corresponding to the whole kidney biopsy and give it the
Required data:
| Folder | Description | Location | License |
|---|---|---|---|
| Histology (PAS-HE-IHC) | H-DAB images of kidneys into which glomerulus are visible and lungs into which alveolus are present | DOI: 10.1038/s41467-023-40291-0 | MIT |
Note
Keep your project tidy for this exercise: we will use it as an input for another exercise!
A. Locate the kidney
- On these images, kidneys are solid circular blocks with no to little holes (so we will ignore them).
- Before starting, make sure that you have the
KidneyandGlomerulusclasses in your class list. If you miss them, you can generate them using the "+" button above the class list. - To locate your kidneys, you can either use the
 ellipse tool or the
  wand tool.
 - Like with any selection tool, you can push your active polygon from inside (
 ) or from outside (
 +).
+). - Once you are done, before going to the next image, don't forget to:
- Assign the
Kidneyclass to the annotation - Lock it with
 +
+ or
or  > "Lock".
 - Save the project.
- Assign the
Tip
Don't forget that the scale at which your wand tool works depends on your zoom level.
B. Locate the glomeruli
- What the glomeruli look like is indicated by the green blinking polygons in the first section of this exercise.
- To create polygons around the areas of interest, you have two options: You can either go with the wand tool or with the
 polygon tool.
 - Don't forget to give the correct class to every new annotation you make.
- Once you selected every area of interest, take a look at your annotations list and:
- on the first
Glomeruluspolygon of the list.  + on the last
 Glomeruluspolygon.- Click on the
 next to "Select all" and "Delete".
 - In the menu showing up, go to "Edit multiple annotations" > "Merge selected".
- This should have merged all the polygons into one. Don't forget to lock the newly created polygon.
- You can now save the project (+
 ) and go to the next image.
You should end up with polygons looking like that:
C. Export and process the ratio
- Make sure that you saved your project (+) before starting this step.
- If you click on any polygon from your annotations list, you should notice an
Area px^2property. - In the top-bar menu, go to "Measure" > "Export measurements".
- In the list of images, transfer to the right column every image onto which you drew polygons.
- Choose a path for your TSV file. Keep it named
measurements.tsvand leave it in the project's folder. - The "Export type" indicates where the useful information is located. In our case, we want the areas, and we saw that they are present in annotations.
Warning
If you don't save your project after you made polygons on the last image, they won't be exported in the final results even if the polygons are visible.
D. In LibreOffice Calc
- If you open the produced TSV in your spread sheet software, you should notice that you have:
- Two consecutive lines for each image (column "Image")
- One with the
Kidneyclass and the other withGlomurus(column "Classification") - The area for each one of them (column "Area px^2")
- If you want to make the file clearer to read, you can remove useless columns (Object ID, Parent, ...)
- Create a new column that will contain the ratio (ex: "G to K ratio")
- Write the expression to divide the
Glomurusarea by the wholeKidneyarea and apply it to all images. - Optionally, pass the formatting of the column to percentage ("Format" > "Number format" > "Percentage").

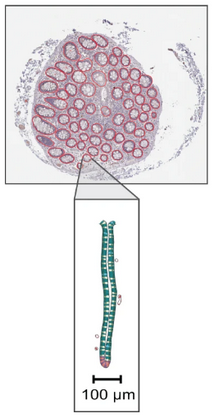
4.1.2 Locate lungs or crypts in large intestine
Goals:
- The overall goal here is to get an idea of the limitations that you will encounter if you stick to manual segmentation. Don't try to finish the tasks.
- The goal of this exercise is to:
- Try to manually segment the lungs tissue present on an image.
- Try to manually segment the crypts within some large intestine images.
- To do so, you will try to:
- Find the polygon corresponding to the whole lung and give it the
Lungclassification. - Find the set of polygons representing crypts and give them the
Cryptclassification.
- Find the polygon corresponding to the whole lung and give it the
Required data:
| Folder | Description | Location | License |
|---|---|---|---|
| Histology (PAS-HE-IHC) | H-DAB images of kidneys into which glomerulus are visible and lungs into which alveolus are present | DOI: 10.1038/s41467-023-40291-0 | MIT |
A. Lungs
- Create a new project.
- In the dataset, alongside the kidney images, you should find both lungs and large intestine images.
- Import a couple of lung images into this new project.
- Lungs, contrary to kidneys, are very sparse. We cannot just make a whole circle around them.
- Try (without finishing, don't spend more than 20 seconds here) to use the wand tool to make a polygon representing the object.
B. Crypts in large intestine
- Still in the same project, import some large intestine images.
- The shape by itself is not as bothering as for lungs, but the crypts to be segmented are hard to catch with the wand. You would have to make a manual polygon around each one (again, don't spend more than 20 seconds to make polygons around crypts).
In the following exercises, we will cover more efficient ways to find our objects and to locate sub-structures within them.