 |
 |
 |
|---|---|---|
| Ex 5.3: Segmentation quality control | • | Ex 5.5: Use InstanSeg in QuPath |
5. Cells detection
5.4 Use CellPose in QuPath
CellPose is another deep-learning architecture aiming to segment any bloboid object. Many models exist and are available to download. (It is particularly easy to create your own as well.)
Its most polyvalent models family "cytoN" includes in its training dataset many objects that are not cells or usual biological object making it very polyvalent, and able to handle some objects such as the ones you can see through the windows right now.
5.4.1 Count vesicles per cell
Goals:
- We want to count the number of vesicles per cell and the number of non-absorbed ones floating in the field.
- To do so, we will need to:
- Segment each individual cell
- Segment each individual vesicle
- Assign each vesicle to a cell or to the background
- Run that for the whole image
- Export the measurements
Required data:
| Folder | Description | Location | License |
|---|---|---|---|
| BBBC021-composites | Fluo images of human MCF7 cells (nuclei, tubulin, actin & vesicles) | BBBC021, "copyright AstraZeneca Pharmaceuticals" | - |
A. Get the data ready
- We have four channels on our images and they are named after their index, which is not the easiest scenario to find which channel to work on.
- We can reuse the
 ch_name_and_luts.groovy script that we saw in a previous exercise.
 - The order of channels is:
- Nuclei
- Tubulin
- Actin
- Vesicles
- The LUTs are up to you, just remember that the order of the triplet is red, green and blue and the values range from 0 to 255.
- Once you set the names and the LUTs, you can run the script for the whole project.
B. Use CellPose's template script
- To avoid waiting for too long while searching the good settings, make a
 rectangle containing only half or a quarter of the image.
 - CellPose can only be executed from a script. The template for fluo cells is located in "Extensions" > "CellPose" > "CellPose detection script template".
- The first thing that you should check is the model's name. In our case, we are going to stick to "cyto3", which is the most polyvalent model of CellPose 3.
- In the CellPose configuration below, you will notice that many lines start with "//". It means that the line is ignored (it's a comment). Depending on what we need, we will have to remove the "//" to reactivate the instruction.
a. 'Pixel size' or 'diameter'?
- The most important thing that we need to address right away is the use of ".pixelSize" vs. ".diameter" that you can see in the list of settings.
- pixelSize determines the downsampling used on the image that we will feed to CellPose. The bigger the pixel size is, the smaller the objects are if you measure diameters in number of pixels.
- diameter is the median diameter (in number of pixels) of the objects that you want to segment. CellPose will automatically rescale your image so the length that you provided here becomes 30 pixels (ex: if your image contains a circle of 45 pixels of diameter and you provide 45 in the field "diameter", CellPose will rescale the image for the circle to be 30 pixels of diameter.).
- The problem comes from the fact that CellPose expects the objects to have a median diameter of 30 pixels. So:
- If you change the pixel size, the diameter in pixels that you observe on your image won't be correct, it won't match the downsampled image.
- If you change the diameter value, it will invalidate the downsampling that you provided.
- Actually, both these settings influence the same thing: they both result in a resampling of the image. If you use them both, you will do a double-resampling which is very hard to manage. You should either:
- keep diameter at 30 and play with the pixel size.
- set the pixel size to the original pixel size and tune the diameter.
- We will go with the second option in this exercise, simply because on small objects like this, it is easier to roughly eyeball a number of pixels rather than calculating by which downsampling factor our objects will end up being 30 pixels in diameter.
- If you go in the "Image" tab (next to "Project", "Annotations", ...) and check the pixel size, you will notice that these images are not calibrated (both their pixel height and width are at 1). Give this value to the ".pixelSize" method of the script.
b. Other settings
- You must tell in ".channels" onto which channels CellPose should search for objects. Why "channels" and not "channel"? Because whenever you have a channel of nuclei, CellPose can rely on it to provide a better segmentation of your main objects. In this case, you must provide first the channel representing your objects (in our case the actin or the tubulin, find which one works better) and the name of the nuclei channel in second position. Text parameters are passed between quotes and separated with commas (ex: .method_name("param1", "param2", "param3")).
- We don't want our segmentation to be biased by the intensities in our images. Whether the histogram goes from 10 to 3500 in the first image or from 3300 to 62350 in the second image should not matter, so we will activate the call to the "normalizePercentilesGlobal" method by removing the "//" at the start of the line. The first two values are the percentile at which we will crop the image's histogram (so we ignore cold or hot pixels). The last parameter is a downsampling factor for the histogram calculation. Keep the default values, or just decrease the last one (our images are small, we don't really need downsampling).
- We next move to the ".diameter" method that we need to activate. Try to very roughly eyeball how many pixels in diameter is the average cell. If you struggle making an estimation, you can use a line annotation. It's length is automatically processed in its properties. Don't forget to remove it and to make your rectangle annotation active again if you choose this solution.
- We won't do quality control on these images, so you don't need to reactive the ".classify" method, we will keep our cells unclassified.
- The last method that we will reactivate is the ".createAnnotations" one. By default, CellPose creates detections for the cells that it finds, but if you remember the step 3 of our goals (Assign each vesicle to a cell), you will notice that this is problematic. Indeed, a detection cannot have children, so we wouldn't be able to bind vesicles to cells! Fortunately, annotations can have children, and this method allows to ask CellPose to create annotations instead of detections.
- If you struggle completing your settings, you can use the following snippet as a starting point:
def cellpose = Cellpose2D.builder( pathModel )
        .pixelSize(1.0)
        .channels('Actin', 'Nuclei')
        .normalizePercentilesGlobal(0.1, 99.8, 5)
        .diameter(55)
        .createAnnotations()
        .build()
c. For the whole project
- Before starting, remove your testing annotation and everything it contains.
- As you noticed, the template script contains the line
def pathObjects = getSelectedObjects(), meaning that it works only on the active annotations. - Before this line (wherever you want), you need to add the instruction to create a full image annotation and make it active.
- Doing that introduces another problem: we will have an annotation for the whole image and an annotation for every single cell, it will be a terrible mess in the project and in the final TSV! We need a way to identify the whole image annotation.
- To do that, go check the
 QuPath's API. We will search for something that would allow us to change the classification of the active annotation to
 Region*. All objects such as annotations, detections, cells, ... are derived fromPathObject, and so is our full image annotation. So in the search bar located in the upper right corner, search for thePathObjectclass. - In the methods list (== skills list), search something about setting a classification. In there, you should find
setClassification(String classification). - At the line
def pathObjects = getSelectedObjects(), the full image annotations is being captured in thepathObjectsvariable that contains a list of every single select objects. - So, given the method that you found in the API and the
pathObjectsvariable, we just need a way to ask QuPath to set the classification of all objects present inpathObjectstoRegion*. You can to that with the snippet of code:
for (obj: pathObjects) {
    obj.setClassification("Region*")
}
- This simply means "for each object that you will find in pathObjects, use its setClassification skill with the 'Region*' parameter.
- You can copy and paste that under the
def pathObjects = getSelectedObjects()line. - Once it is done, use the
 "more options" button to run the segmentation on your whole project.
 - Don't forget to save your project after the run!
C. Detect the vesicles
a. Create the classifier
- After this step, we want to have each vesicle represented as a detection. We don't care of having the perfect outline of each object, we just want to count them.
- To achieve that task, we will simply rely on a thresholder like we did in the chapter of tissue classification and segmentation.
- Before starting, create a
Vesicleclass if you don't already have one. - Vesicles are very small so it is recommended to hide all other channels to have a better reading of the field.
- If you look closely at the image, you will notice airy patterns around each vesicle and it will actually bother us if we tried to go with a simple intensity-based threshold.
- To address that problem, we will use a prefilter in our thresholder.
- In the top-bar menu, go to "Classify" > "Pixel classification" > "Create thresholder...".
- As mentioned before, our vesicles are like 3 or 5 pixels in diameter, which means that we need to work at full resolution. We can't aford to work on a downsampled image.
- Set the segmentation channel to the one containing the vesicles.
- Now comes the moment to choose a prefilter. We need a filter that will smooth the background, highlight objects of a certain size and help splitting close ones. It is a perfect use case for the "Laplacian of Gaussian" filter!
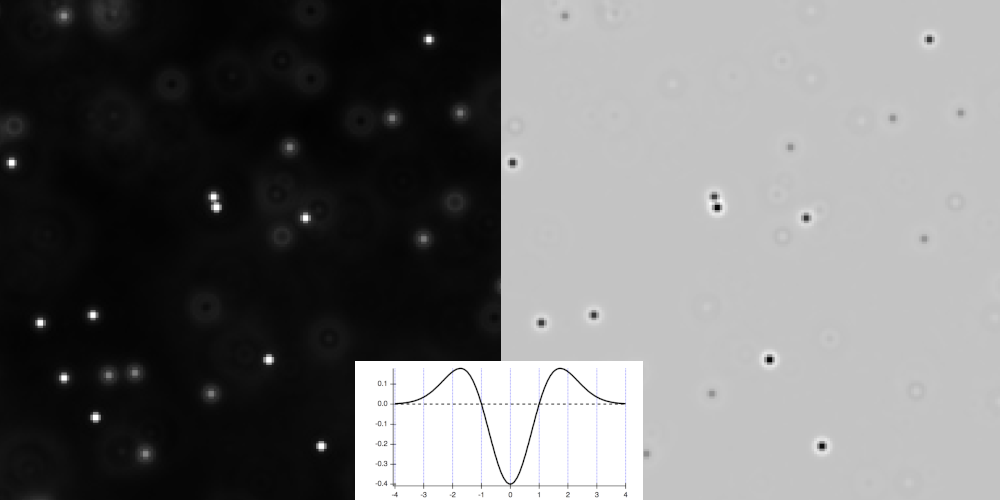
Warning
As can see it on the function plot and on the preview, the LoG produces a strong negative peak at the center of objects so even though we are on fluo images, using this particular filter will make you work like on an image with light background.
- We work on small objects, it implies that you will have to keep a small sigma (≈1).
- Due to the LoG filter, we are now on a brightfield image (light background and darker objects). This means that our objects will be below the threshold, and the background will be above. Set the "Above threshold" to
Ignore*and "Below threshold" toVesicle. - It is now up to you to find a threshold value keeping at least one pixel per vesicle. As a reminder, the peaks of the LoG are strongly negative, so don't bother exploring positive values.
- If you are struggling finding good parameters, a decent starting point would be a sigma of 1.0 with a threshold to -1000.
- Once you judge correct what you see, give a name to your pixel classifier and save it.

b. Try the classifier
- You can test the classifier on the current image.
- To do that, start by making your full image annotation active.
- Then, go to "Classify" > "Pixel classification" > "Load pixel classifier..." and in the list, search for the classifier that we just created.
- Use the "Create objects" feature.
- Tell QuPath that you want to work within the current selection (the full image annotation).
- In the "Create objects" window that should have appeared, set the objects type to "Detections" and activate "Split objects" for every vesicle to be its own detection (otherwise they would be aggregated in one detection gathering all polygons).
- You can launch the process and close the "Load pixel classifier" window once its done.
- You should save your project at this point.
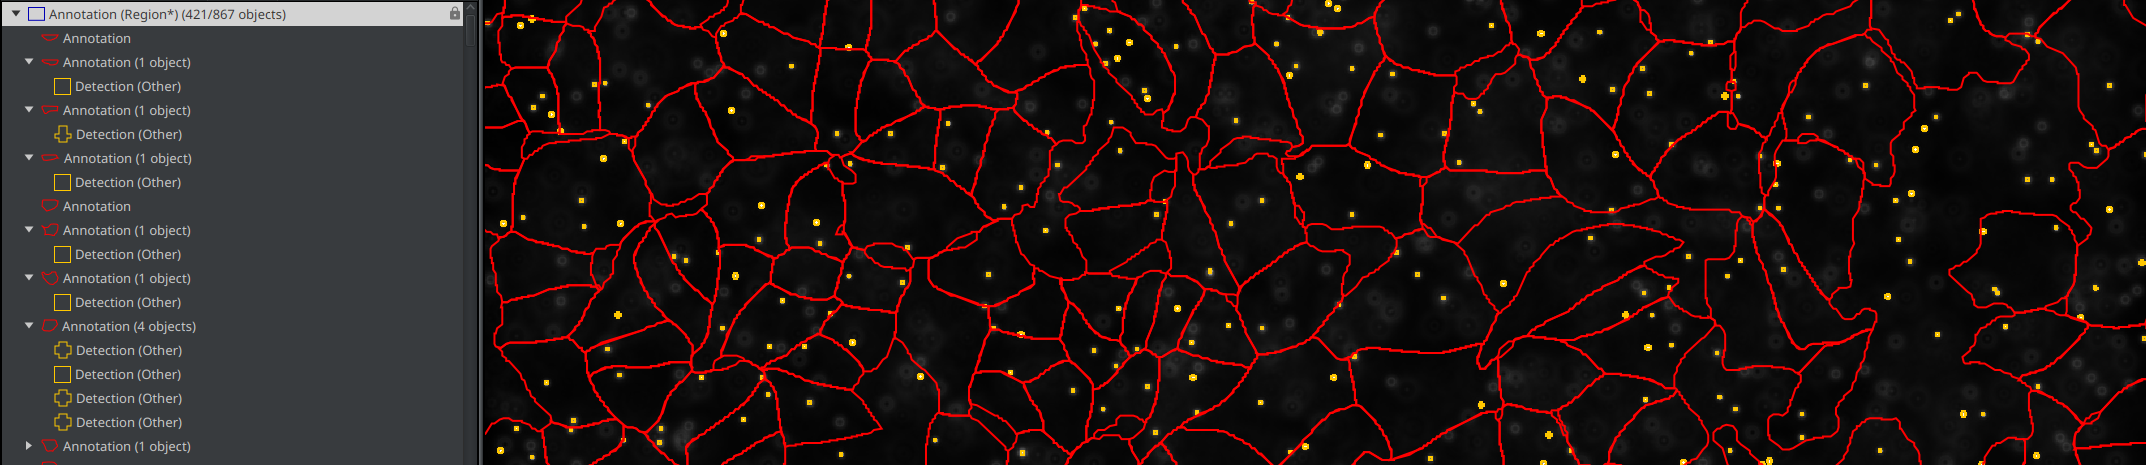
- In the top-menu bar, go to "Objects" > "Annotations" > "Resolve hierarchy". It will reprocess which object belongs to which one for this image.
- If you go in the "Hierarchy" tab (alongside "Project", "Annotations", ...), you should see your full image annotation as the root of everything. Inside it, you should find each cell and each vesicle that doesn't belong to any cell. Inside each cell, you should see which vesicles it owns.
c. Run the classifier for the project
- Go to the "Workflow" tab and convert your commands history into a script.
- You just need to keep two lines:
- the one about creating detections from a classifier
- the one about resolving the hierarchy
- Delete everything else.
- We still miss something. We want to launch the classifier on the full image annotation, but whenever we open an image, we have a ton of annotations and none of them is active...
- Fortunately, we had the very convenient idea to give the
Region*class to our full image annotation before! - Go back in the QuPath's API and search for something about selecting objects by classification.
- If you cannot find it, the function is
selectObjectsByClassification(String... pathClassNames). The "..." after "String" means that you can provide as many classes as you want separated by commas. - Here, we just want to call
selectObjectsByClassification("Region*"). - Your final script should look like:
selectObjectsByClassification("Region*")
createDetectionsFromPixelClassifier("find-vesicles", 0.0, 0.0, "SPLIT")
resolveHierarchy()
- You should now be able to launch this script for the whole project, except for the image onto which you just ran it.
- Don't forget to save your project once the batch is over.
C. Export the measurements
- When you will export your measurements, set the export type to "Annotation": we want the number of spots per cell and our cells are annotations.
- If you look at the TSV in LibreOffice:
- Each row is a cell (or the background).
- The "Num Detections" column contains the number of spots owned by this annotation.
- The background can easily be found because it is the only one with the value "Region*" in the "Classification" column.