|
 |
|---|---|
| Ex 4.5: Segmentation quality control | • |
4. Tissue segmentation and classification
4.6 Area of signal per slide
Measuring the area taken by the signal of N channels in a fluo image is a quite common task but several pitfalls must be avoided. The main one is to adjust the brightness and contrast on each image, which will influence what you see as positive or not.
We will try to use a pixel classifier to have a comparable result and the same bias for each image.
4.6.1 Area of P1, P2 and P3 per slide
Goals:
We want to measure the area covered by the signal on each channel, on the whole images, following several rules. The rules are as following:
- The channel 1 and 2 are mutually exclusive (== there cannot be 1 where there is 2 and vice versa)
- The channel 3 is mutually exclusive with 1 and 2 (== if there is 1 or 2, you can't have 3) To satisfy these constraints, we will train a pixel classifier (like for Ex 4.3: Using a N-classes pixel classifier) on a training image containing representative regions.
We will try to find 4 classes: P1, P2, P3 and Ignore*.
Required data:
| Folder | Description | Location | License |
|---|---|---|---|
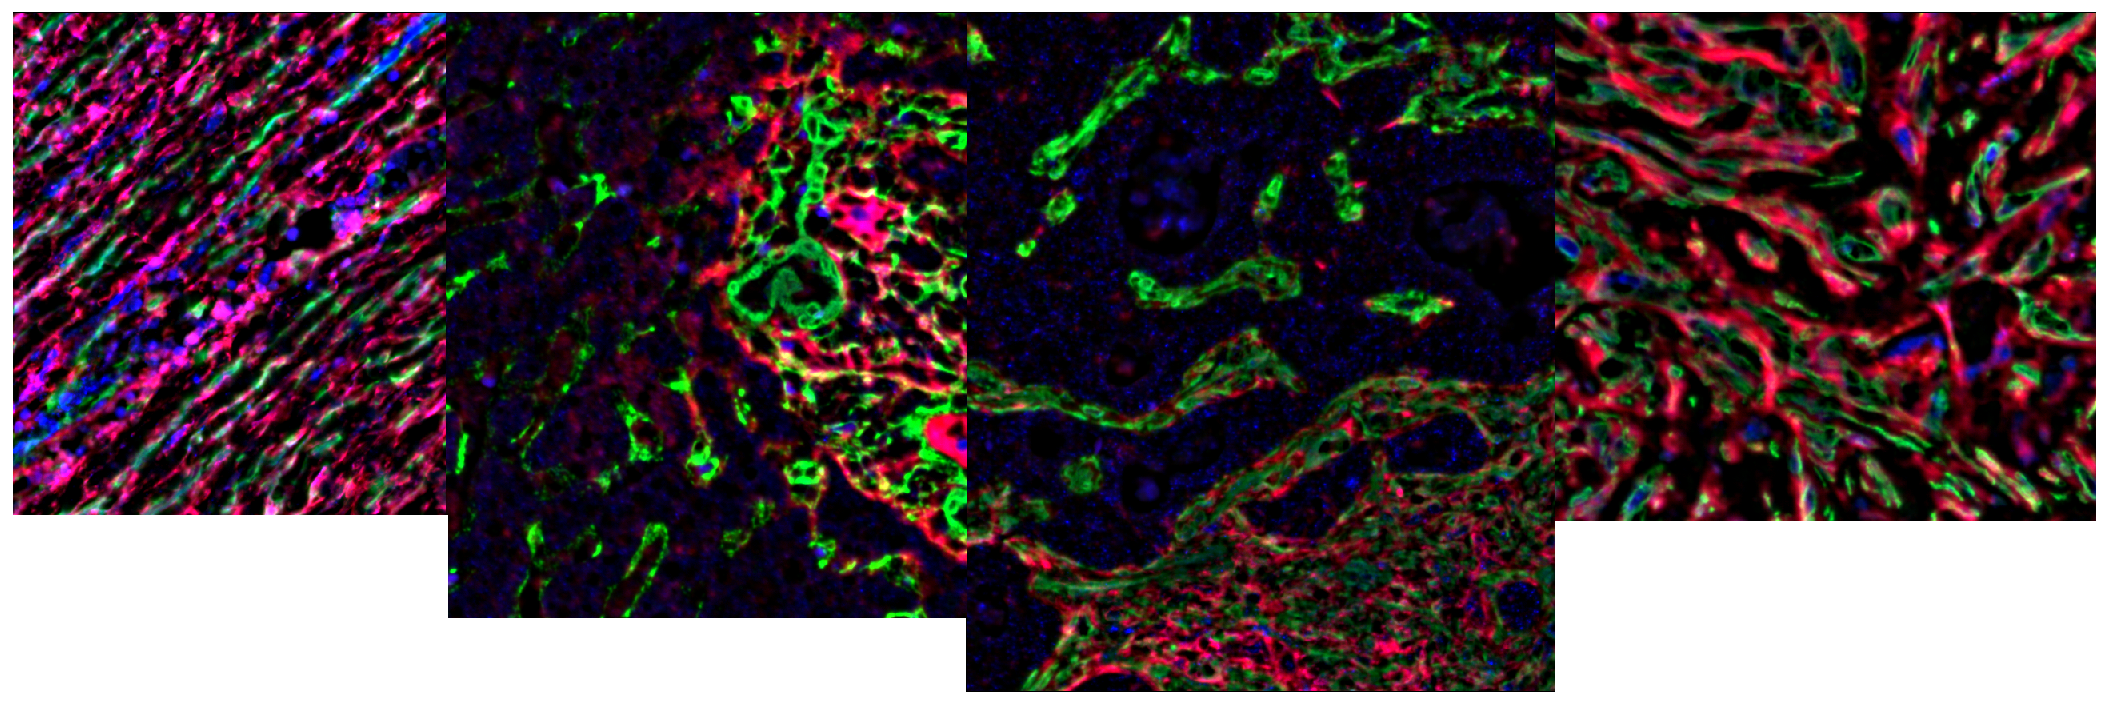
| Area of fluo | Fluo images with three channels containing objects that we will name P1, P2 and P3 | Courtesy of Claire CRAMPES and Tommy CHASTEL, Andrei TURTOI team, IRCM | - |
A. Create a training image
- On these images, the whole field contains something, so we can skip the step where we segment the whole organ. We can go to the training right away. The first step is to create a training image containing representative areas from all slides.
- To help you pick your regions, you should visualize your images using the same LUT and brightness and contrast.
- To do that, we will start by using the script that you can find in scripts/utils/ch_name_and_luts.groovy. If you load it in QuPath, you can edit the content of
channels_nameto set the channel names toP1,P2andP3. You must also change the content ofLUTsso the names match the channel names that we just provided. If you whish, you can change the LUTs by providing some RGB triplets as you can find using any color picker. - Once you chose your names and your LUTs, run the script for the whole project.
- You can now open the
 channels tools, but before adjusting anything, make sure that the "Apply to similar images" checkbox (at the very bottom of the floating window) is activated. That will apply the same B&C to all the images of your project.
 - Using some
 rectangle annotations and the
 Region*class, you can now constitute a representative set of regions. - Once you estimate that your set contains approximately every situation, you can go to the top bar menu and create your training image using "Classify" > "Training images" > "Create training image...". If you used the
Region*class for your rectangles, you don't have anything to change in the settings.
B. Train the classifier
- We named our channels
P1,P2andP3but it is very unlikely that you have the classesP1,P2andP3in your class list. - To address this situation, you can go to the top of your class list, next to the "+" and "-" button you should have a little triangular button. If you click on it, you should see the option "Populate from image channels". If you launch it, the list should now contain the classes that we need..
- Activate the
 point clouds tool and using the "Add" button, create 4 point clouds. Give the classes
 P1,P2andP3to three of them, andIgnore*to the last one (that will contain the background). - Like we did in Ex 4.3: Using a N-classes pixel classifier, start by providing betwen 10 and 20 points per class using the rules mentionned in the "Goals" section of this exrcise.
- Then, go to "Classify" > "Pixel classification" > "Train pixel classifier..."
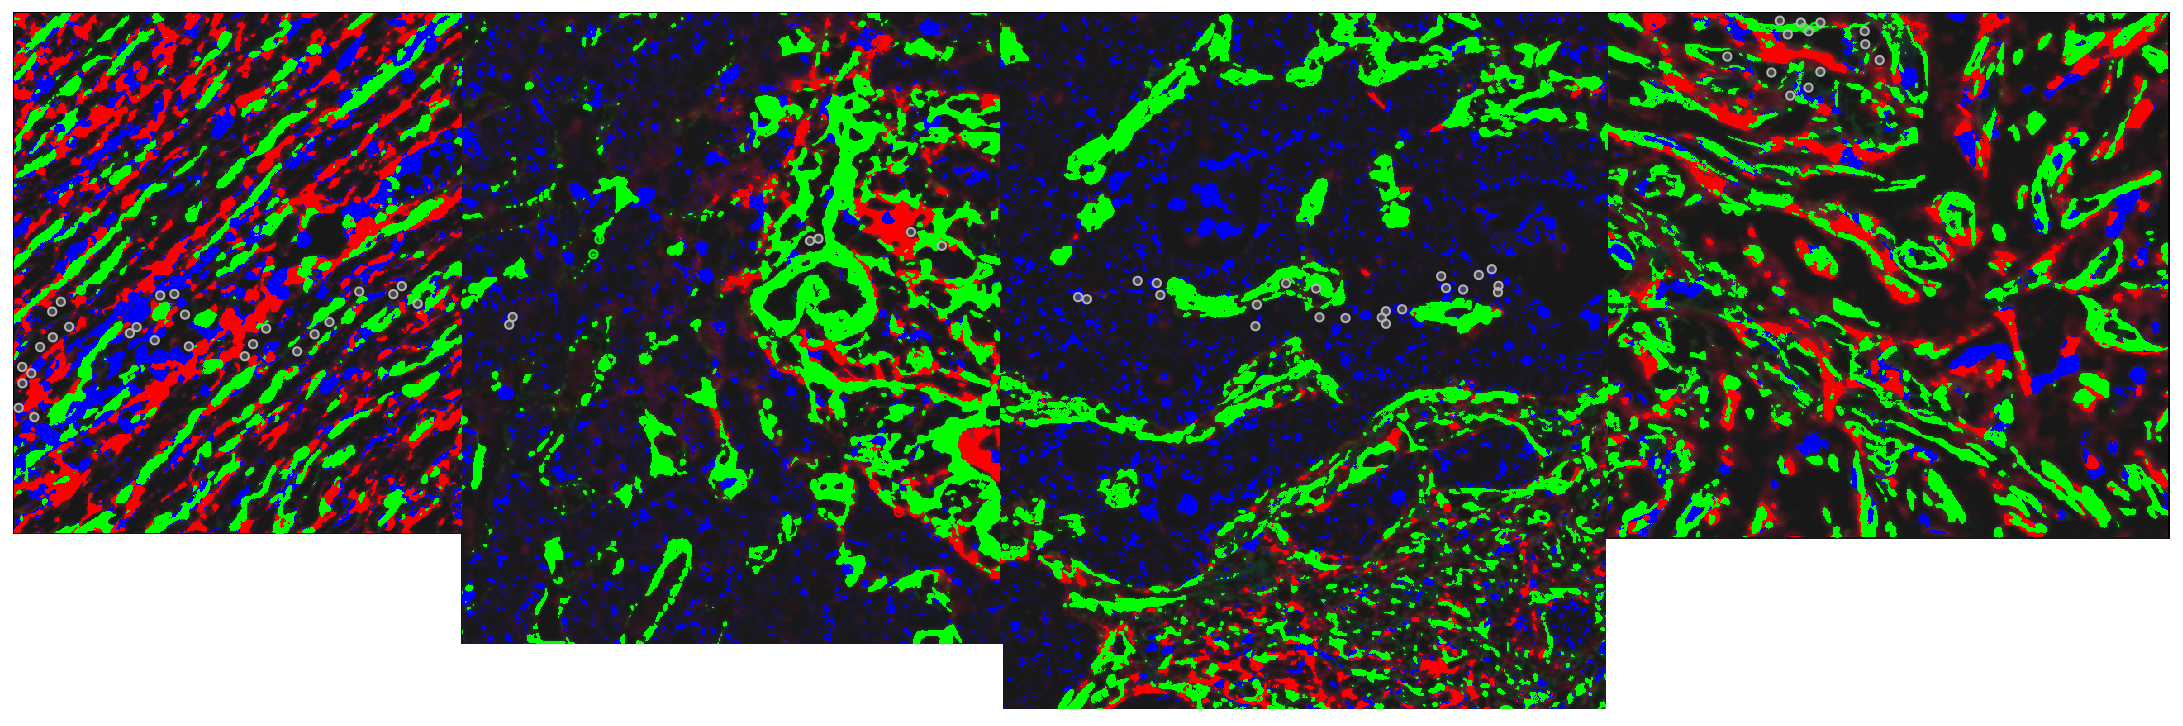
- Start by choosing the algorithm (Random trees) and adjusting the resolution. If you look at the images, you will notice that the signal of P2 makes small spots of a few pixels of radius in certain situations, so we need to work at full resolution.
- With the "Live prediction" ativated, you should now choose your features and their radii by checking whether they are useful or not.
- Iteratively, you will add points until the result looks satisfying. Don't forget to keep the number of points in each class approximately equal.
- Finish by naming and saving your classifier (and your project). For this example, we named the classifier "find-dyes".
C. Use the classifier to measure areas
a. On one image
- Go on any image of the project.
- If some
Region*annotation is present, remove it using the same technique we did before: right-click on the
 Region*class in the list.- "Select objects by classification"
- Click on "Delete"
- The whole field is filled with some objects but QuPath is only able to launch classifiers in annotations for measurements, what can we do then?
- In the top bar menu, go to "Objects" > "Annotations" > "Create full image annotation".
- With the annotation still active, go to "Classify" > "Pixel classification" > "Load pixel classifier..."
- In the dropdown menu, choose the classifier that we just trained.
- Using the "Create objects" button, create detections for each dye (don't split them, don't remove debris, don't fill holes).
- Using the "Add measurement" button, inject the area of each dye in the parent annotation's data.
- You can close the "Load pixel classifier" window and save your project.
b. On the project
- Go to the "Workflow" tab and turn your commands history into a script using "Create script".
- Among all the lines that you have, you should only keep the five ones to:
- Select and remove the
Region*annotations. - Create the full image annotation and make it active (it's what the 'true' is for in the parenthesis).
- Create detections using the pixels classifier inside the current annotation.
- Create measurements using the pixels classifier inside the current annotation.
- Select and remove the
- Your final script should look like this:
selectObjectsByClassification("Region*");
removeSelectedObjects()
createFullImageAnnotation(true)
createDetectionsFromPixelClassifier("find-dyes", 0.0, 0.0)
addPixelClassifierMeasurements("find-dyes", "find-dyes")
- Don't forget to save your project as well as the script at this point.
- Using the
 "more options" buttons, run the script for all the images of this project (except the sparse image and the one you processed manually).
 - Save your project once the processing is over.
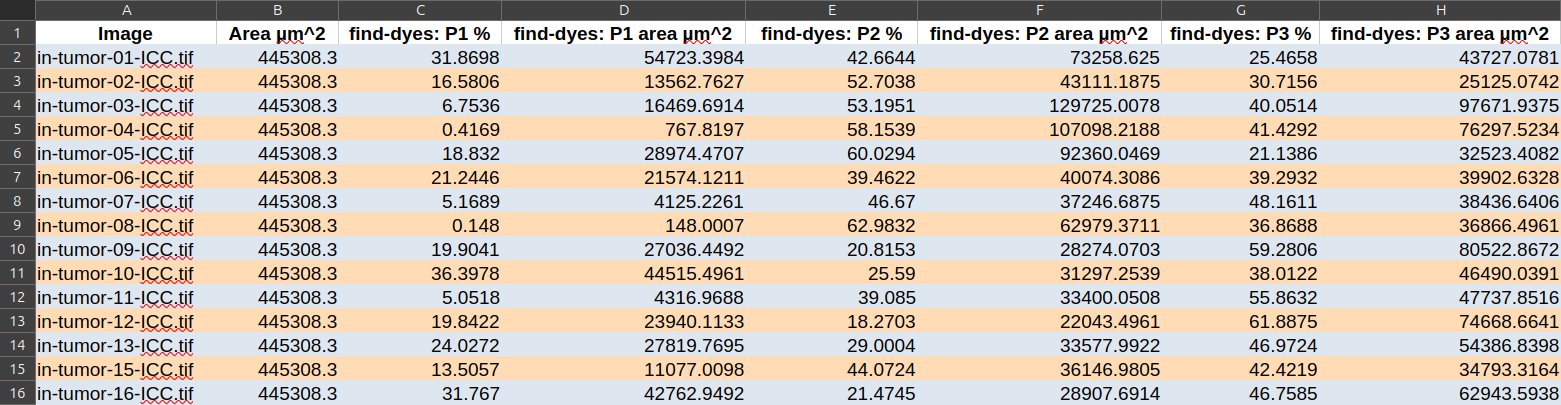
D. Export your measurements
- If you saved your project, you can go to "Measure" > "Export measurements...".
- Move to the right column all the images on which you ran the analysis.
- Provide a path for your TSV file.
- The informations we are interested in (the area occupied by each dye) is a property of annotations. You can verify that by clicking on any full-image annotation and looking in its properties in the lower left panel of QuPath.
- If you export your measurements, open them in a spread sheet and remove the useless columns, you should get something similar to: