 |
 |
 |
|---|---|---|
| Ex 4.4: Semi-automatic segmentation using SAM | • | Ex 4.6: Area of signal per slide |
4. Tissue segmentation and classification
4.5 Segmentation quality control
So far, we tried different ways to segment tissues. But saying that a result is "good" or "bad" is subjective unless we define objective measurements.
In this exercise, we focus on segmentation quality control by comparing reference annotations (ground truth) and predictions.
The quality control is only possible because for this dataset, we have the ground-truth realized by an anapath.
4.5.1 Segmentation metrics (reference vs prediction)
Goals:
- The goal of this exercise is to compares two segmentations workflows:
- To do so, along this exercise, we will:
- Change the class of your objects from
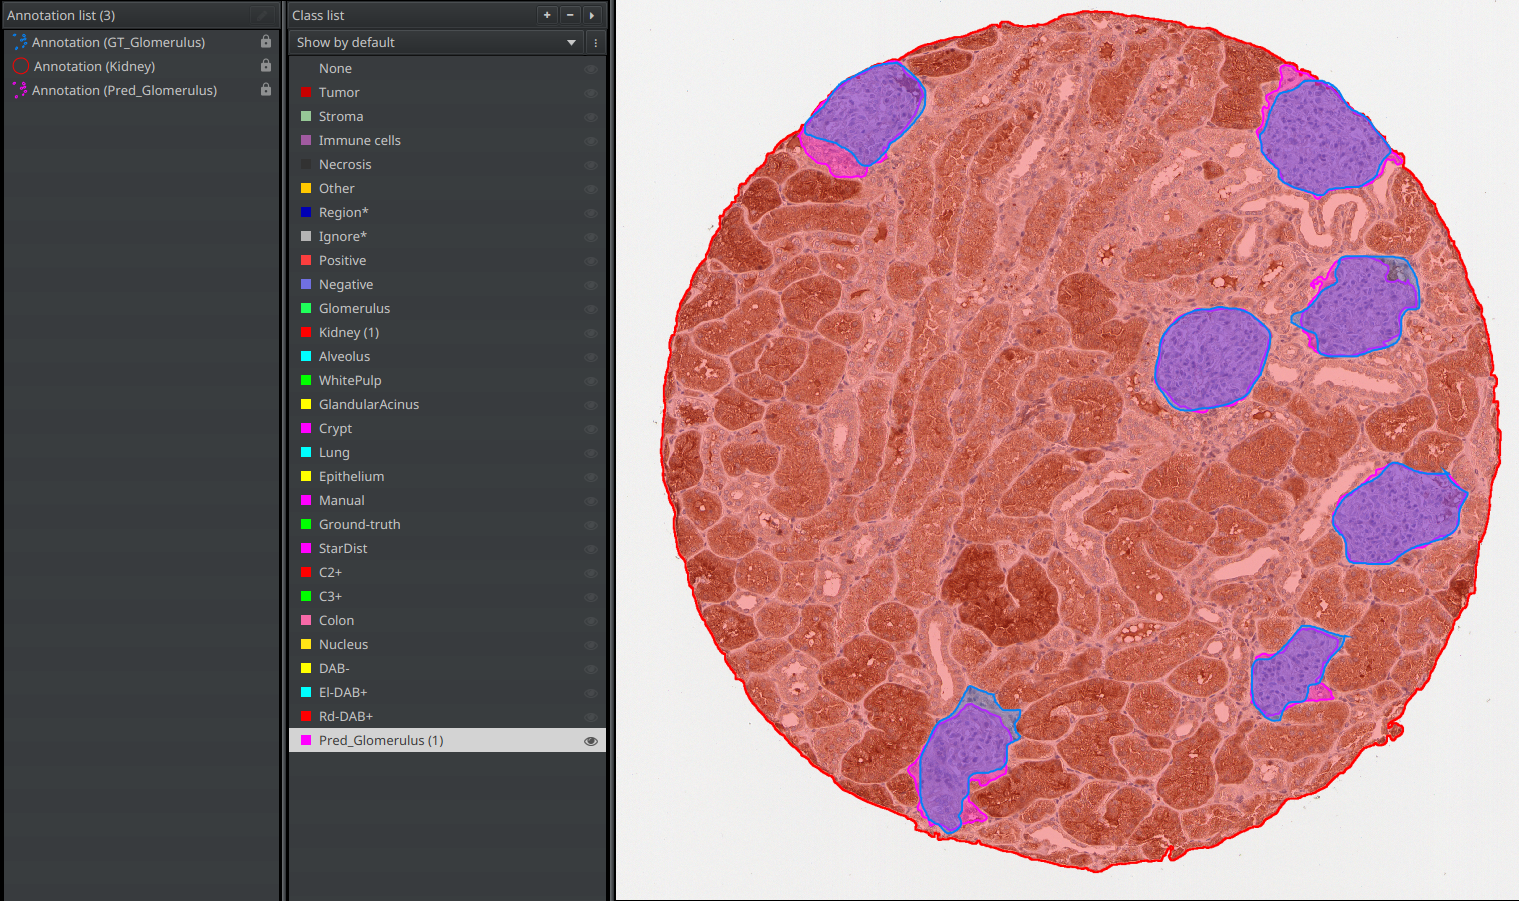
XXXtoPred_XXX(ex:GlomerulustoPred_Glomerulus). - Import the set of ground-truth annotations and give them a class being the object prefixed with "GT_" (ex:
GT_Glomerulus). - Create
Inter_Target(GT ∩ Pred) andUnion_Target(GT ∪ Pred) using a Groovy script. - Compute
IoU,Dice,PrecisionandRecallautomatically for each image. - Export one image-level TSV file for comparison between methods.
- Change the class of your objects from
Required data:
| Folder | Description | Location | License |
|---|---|---|---|
| Histology (PAS-HE-IHC) | H-DAB images of kidneys into which glomerulus are visible and lungs into which alveolus are present | DOI: 10.1038/s41467-023-40291-0 | MIT |
Note
If you didn't complete both projects with the same images, you can find on the sDrive in the "solutions" folder, two projects from which you can start.
A. Prepare the project for evaluation in QuPath
- You have to repeat the following steps twice: once in the "fully manual" project and the other in the "SAM segmentation" project.
- If the
Pred_Glomerulusclass doesn't exist yet in your classes list, create it. - Do a right-click on the
Glomerulusclass, and use the "Select objects by classification" feature. - Now, left-click on your newly created
Pred_Glomerulusclass and use the "Set selected" button below the classes list. YourGlomerulusannotation should now have thePred_Glomerulusclass. - In the script editor, open and run scripts/tissue-segmentation-classification/unpack-annotations.groovy.
- The purpose of this script is to automatically import the ground-truth annotations stored in the "annotations" folder (alongside the "images" folder in the workshop's data).
- You should now have both your
Pred_Glomerulusannotation and aGT_Glomerulusannotation. - Save your project again.
B. Create Inter_* and Union_*
a. For one image
- Open scripts/tissue-segmentation-classification/build-intersection-union.groovy in the script editor.
- Edit only the
def target_class = "XXX"line. It should be the name of the objects you have been working on (ex: "Glomerulus")
target_class = "Glomerulus"
- Click "Run" for the current image.
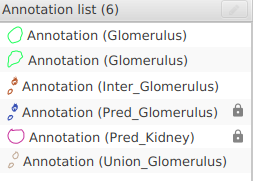
- In the annotations list, two new annotations should have appeared:
Inter_Target: The area in common between your version and the ground-truth.Union_Target: The total area covered by your version and the ground-truth joined together.
b. For the whole project
- Use the
 "more options" button next to "Run" and choose "Run for project".
 - Save your project at the end.
Tip
If you frequently reuse these scripts, place them in your QuPath user scripts directory ("Automate" > "User scripts..." > "Open script directory") so they are directly accessible from the menu.
C. Compute segmentation metrics automatically
a. For one image
- Open scripts/tissue-segmentation-classification/compute-segmentation-metrics.groovy.
- Just as you did in the previous script (build-intersection-union), edit the
def target_class = "XXX"line for it to contain the object's original classification:
def target_class = "Glomerulus"
- Click "Run" for the current image.
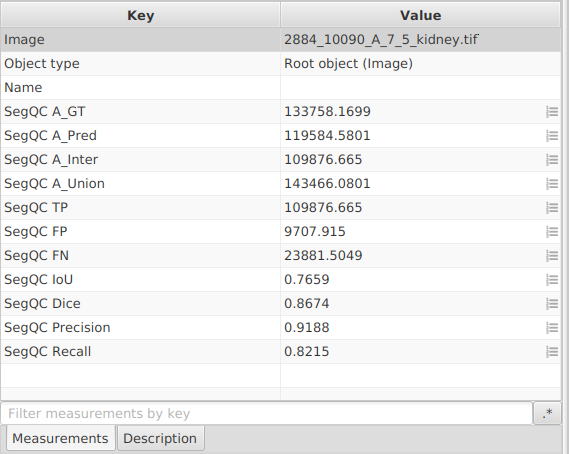
- The script writes image-level measurements:
SegQC A_GT,SegQC A_Pred,SegQC A_Inter,SegQC A_Union,SegQC IoU,SegQC Dice,SegQC Precision,SegQC Recall. It means that if you double-click somewhere in your viewer, outside of the image and outside of any annotation (to make everything inactive), you should see the measurements in the lower-left panel of QuPath.
b. For the whole project
- Use "more options" next to "Run" and choose "Run for project".
- Save your project at the end.
D. Export your measurements
- Save your project before exporting.
- In the top-bar menu, go to "Measure" > "Export measurements...".
- Transfer all selected images to the right column.
- Choose a path for your TSV file (for example
segmentation-metrics.tsv). - Set "Export type" to
Imagebecause metrics were stored as image-level measurements. - In your spread sheet software, keep columns starting with
SegQCfor method comparison.

E. Which metric to use, step by step
No single metric is sufficient in all situations, so use a combination.
Practical decision workflow
- Rank candidate workflows by median
IoUon the same selected images. - Reject methods with unacceptable
Precisionif false positives are costly. - Reject methods with unacceptable
Recallif missed tissue is costly. - Use median
Diceto break ties (especially for small or fragmented targets). - Report all four metrics (
IoU,Dice,Precision,Recall) in your final comparison.
Typical priorities by use case
| Use case | Priority metrics |
|---|---|
| Balanced segmentation benchmark | IoU + Dice |
| Conservative segmentation (avoid false positives) | Precision + IoU |
| Sensitive segmentation (avoid missed tissue) | Recall + Dice |
| Small objects / fragmented masks | Dice + Recall |
Note
In this chapter, we only cover segmentation quality control. Classification quality control is covered in the object classification chapter.