 |
 |
|---|---|
| Ex 6.1: Threshold-based cells classification | • |
6. Cells classification
6.2 Use a N-classes object classifier
We successfully made bi-partitions of our detections based on a measurement and we even saw how to inject new measurements into each object. Despite that, we are limited to two classes. Beyond that, a threshold is maybe not the most reliable method for classification either... Using the same algorithm as for pixel classification, we will try to make a classifier both robust to intensity shifts and able to partition cells in more than two categories.
6.2.1 Classify cells in colon polyp
Goals:
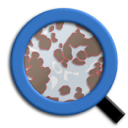
- The final goal is to segment and classify cells from a colon polyp (fluo) so we can know how many cells are present in the epithelium and how many are positive to one dye or another given the fact that these dyes are exclusive.
- The different channels are:
- C1: Nuclei
- C2: Cytoplasmic (+/-) stain
- C3: Nuclear (+/-) stain
- C4: Epithelium
- The classification rules that we will apply are:
- If the cell is in the epithelium, it is classified as
Epithelium, whatever other stain it may visually contain. - If the cell's nucleus is positive to C2, it receives the
C2+class. - If the cell's cytoplasm is positive to C3, the cell becomes
C3+. - If the cell contains both or neither stains, it becomes
Negative. - We will use a last
Ignore*category that will contain StarDist's hallucinations caused by the normalization per tile.
- If the cell is in the epithelium, it is classified as
- If you look at the different images, you will notice that the background and the intensities are not distributed the same way so we need our classifier to be robust against intensity shifts.
Required data:
| Folder | Description | Location | License |
|---|---|---|---|
| Polyp (fluo) | Fluorescence images of colon polyp with 4 channels | DOI: 10.5281/zenodo.18302140 | CC BY 4.0 |
A. Create a training image
- With the whole dataset imported in your project, choose 2 or 3 images that contain what you judge as a representative set (dense areas, sparse areas, brighter areas, unusual shape, ...).
- Once you chose your subset of images, navigate through it and make
 rectangle annotations around the different areas that you judge representative. Don't forget to include "regular" areas in your rectangles.
 - You must give the
Region*class to every representative area that you indicate. - Once you found all your regions, save your project and go to "Classify" > "Training images" > "Create training image...". If you gave the
Region*class to your rectangles, you can validate right away. - A new image named "Sparse image" should appear in your project.
B. Segment and measure cells
a. StarDist settings
- We are going to use StarDist to segment our nuclei from the first channel and expand them by a certain distance to catch the information from cytoplasm.
- Start by going in the top-bar menu in "Extensions" > "StarDist" > "StarDist fluorescence cell detection script" to open StarDist's template in the scripts editor.
- Set the
modelPathvariable to make it point ondsb2018_heavy_augment.pbthat you downloaded as described in the requirements. - Our channels are not named, so the nuclei channel is not named "DAPI" as suggested in the template but simply "Channel 1".
- We have a cytoplasmic staining so to take its information into account, we need to have the
cellExpansionactivated with a certain distance (up to you). - Eventually, you can set the pixel size to 0.45.
b. Parent annotations
- We are left with the problem that StarDist only runs given a set of parent annotations, so we need to make some.
- At the same time, we will try to remove the
Region*annotations that we created to generate the training image. - To do so, we will:
- Select objects by classification (with the
Region*class). - Remove selected objects.
- Create a full image annotation, and make so it's active.
- Give the
Colonclass to the full image annotation. - Launch StarDist in them.
- Select objects by classification (with the
- You have to do all that before the
def pathObjects = QP.getSelectedObjects()line. - You can use
 QuPath's API to find these different functions. If you struggle finding them, you can have them right below:
selectObjectsByClassification("Region*")
removeSelectedObjects()
createFullImageAnnotation(true)
annotations = getSelectedObjects()
for(obj: annotations) {
    obj.setClassification("Colon")
}
- Run this script for the whole project, including the training image.
C. Create an object classifier
a. Place example points
- When we were training pixel classifiers, we were also using point annotations but each point was designating a pixel so their exact position mattered a lot.
- We are now training an object classifier with point annotations but in this case, points will designate objects. It means that it doesn't matter where in the object you place your points.
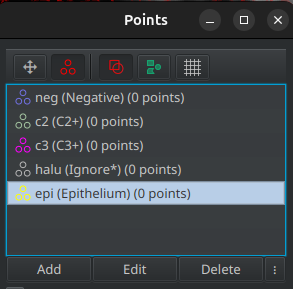
- Open the
 points tool and create a new points cloud for each category:
- Epithelium →
Epithelium - Hallucinations →
Ignore* - Positive to C2 →
C2+ - Positive to C3 →
C3+ - Negative to everything →
Negative
- Epithelium →
- Start by placing approximately 10 to 15 points per class on each object.
- You can now go to: "Classify" > "Object classification" > "Train object classifier..."
- Change the algorithm to use the "Random trees" rather than the "Artifical neural network".
- Pass the "Feature" dropdown menu to "Selected measurements", it should activate the "Select" button right next to it. Click on it to select the measurements that you want to use to classify cells. We will need:
- The "Channel 1" signal in the nuclei to find segmentation hallucinations.
- The "Channel 2" signal in the whole cell to classify to C2+.
- The "Channel 3" signal in the nuclei to classify to C3+.
- The "Channel 4" signal in the whole cell to classify the epithelium.
- The combination of all the above will contribute to find the fully negative cells.
- We are not interested in any shape features so you can remove them all.
- You can now activate the "Live update" to see where you have to add new points.
- If you see misclassified objects, click on the points cloud having the class that the object should have and add a new point in the object.
- Try to keep a similar number of points in each points cloud.
Tip
Whenever an ignored class is involved in cell classification (name ending with '*'), ignored cells will keep the default color (red) so make sure that none of your working classes (Negative, Epithelium, C2+, ...) have the red color, otherwise, you won't be able to make the difference between an ignored cell and a cell having a red class.
b. Create and apply the classifier
- Once you are happy with the preview, you can give a name to the classifier and save it.
- You can now close the "Train object classifier" and the "Points" windows, we won't need them anymore.
- In the top-bar menu, go to "Classify" > "Object classification" > "Load object classifier...".
- In the list choose the classifier that we just trained and apply it.
- The cells have already been classified during the training process so you won't see any visual effect, we just did that for the operation to be registerd in our commands history.
c. Apply the classifier to the whole project
- From the "Workflow" tab, convert your commands history into a script.
- Find the line about running our object classifier and delete everything else.
- In the classification process, we excluded StarDist's hallucination and we don't want these objects to be counted in the total number of cells.
- Open the QuPath's API and search for something about:
- Selectionning objects by their classification
- Removing selected objects
- We used the
Ignore*class (a class with a '*' in its name) for the hallucinations, meaning that at the end of the classification, these objects have no class. So how do you tell in a script that you want to select objects by class if they don't have a class??? If you want to target objects with no class, instead of passing a class name to the function, pass itnull(without quotes). - You should end up with a script similar to that:
runObjectClassifier("classify-cells")
selectObjectsByClassification(null)
removeSelectedObjects()
- You can run this line of script for the whole project. Don't forget to save your project at the end of the run.
D. Export measurements
- If we look back at our goals, the result that we want is the number of cells for each classification.
- If you double-click on the
Colonannotation owning the cells, in its properties (in the lower-left corner), you should see that the count of every object of every class is present. So the useful information is held by annotations. - Go to "Measure" > "Export measurements...". Transfer all the images but the training image in the right column.
- Choose an output path and indicate that the useful information is located in annotations.
- If you open the resulting TSV in LibreOffice Calc, you should have one line per image and the number of cells per class in each column.
