|
QuPath scripts 2024.06.30
This repository gathers generalistic QuPath scripts covering a variety of tasks.
|
|
QuPath scripts 2024.06.30
This repository gathers generalistic QuPath scripts covering a variety of tasks.
|

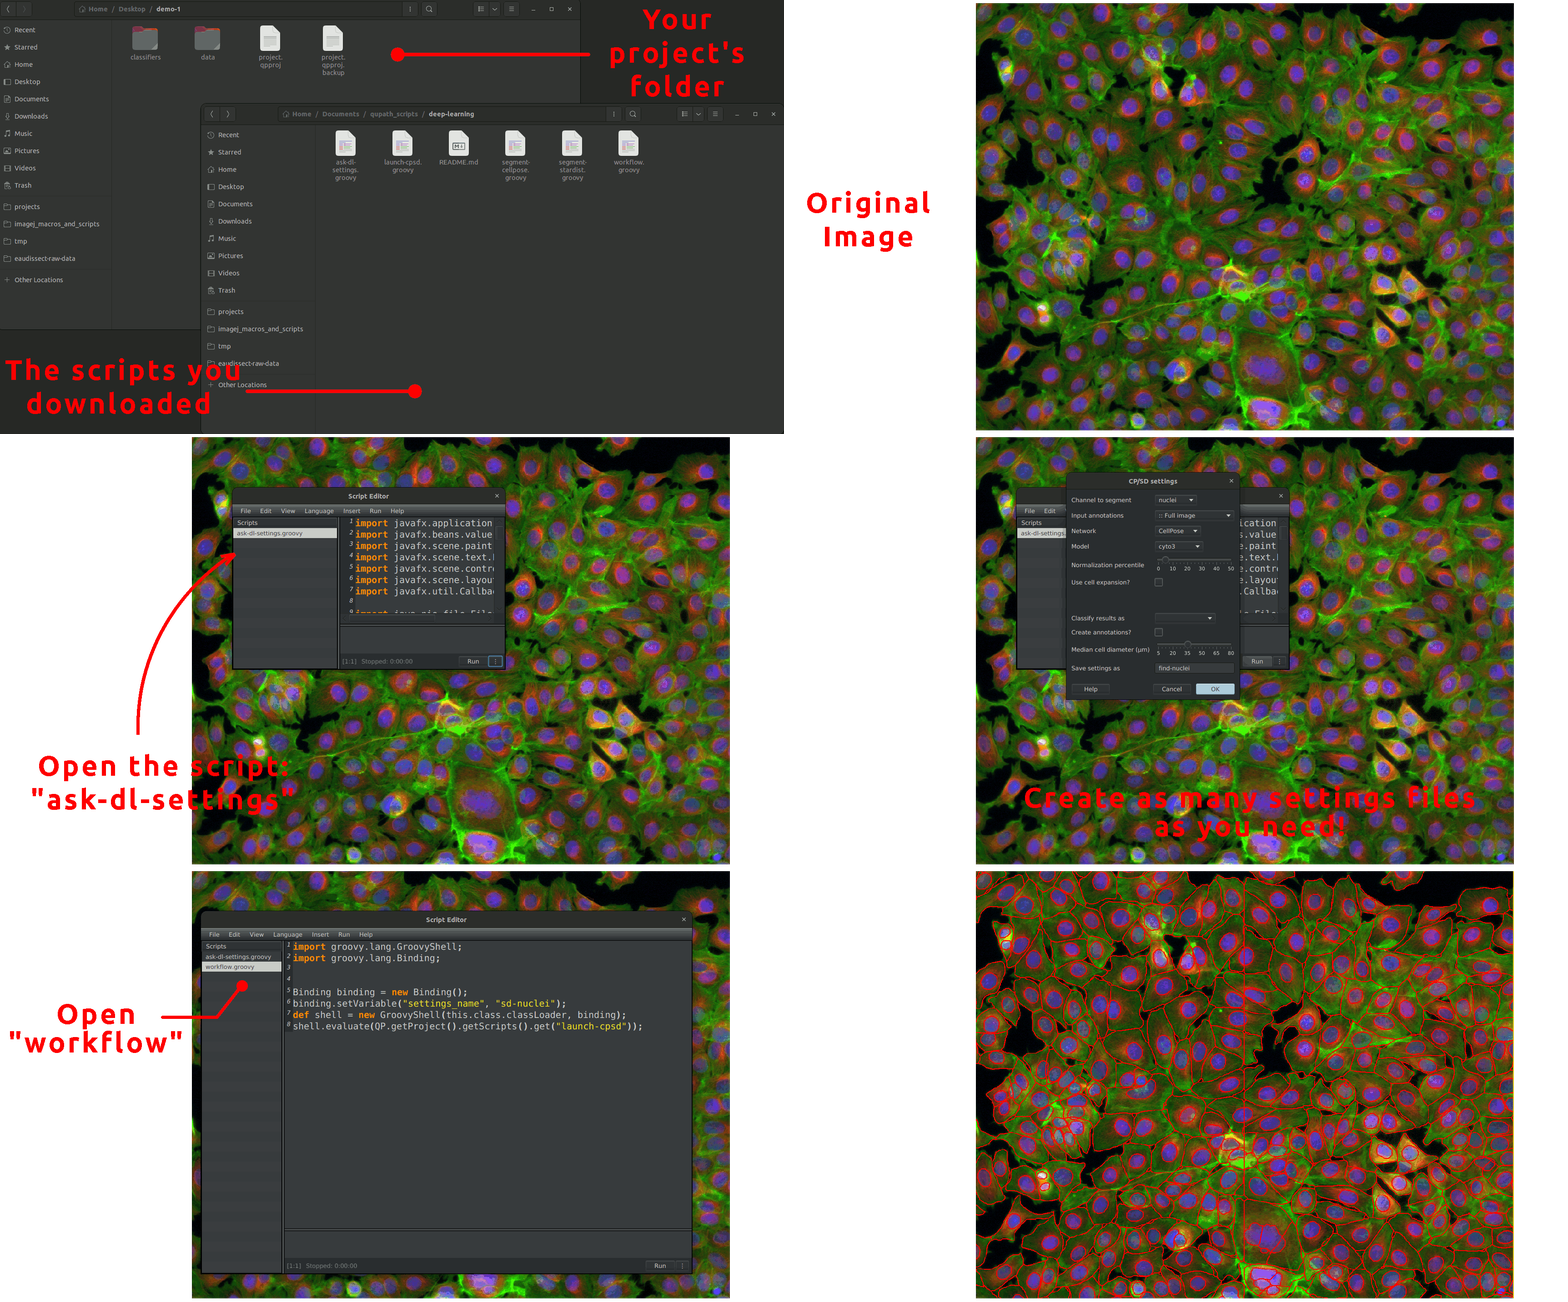
To use these scripts, you simply need to download all the .groovy files from this repository and place them in the scripts folder within your project's folder. If the scripts folder doesn't exist, create it. Your project's hierarchy should look like that:
The workflow.groovy is just a basic template containing the skeleton of a script launching the segmentation process, it is not required.
Before being able to use CellPose from QuPath, don't forget to install the Python package cellpose with pip, and the bridge between QuPath and the CellPose server.
Before being able to use StarDist from QuPath, don't forget to install the bridge between QuPath and StarDist.
This script, which can be found under the name ask-dl-settings in Automate > Project scripts, opens a prompt asking for the settings you want to run CellPose or StarDist with. It allows you to set up common settings for both CellPose and StarDist, giving you control in either case. One goal is to run our workflow in batch mode without a prompt appearing for every image. For this purpose, this script generates a JSON file with your chosen settings and saves it in the project's folder. Once you press "OK" on the window this script opens, your future runs of CellPose or StarDist will use these settings. Then, you can integrate the call to StarDist or CellPose in your workflow without worrying about the settings. You can reuse the generated file in any other project or even make it available for other users. The available settings are the following:
Channel to segment: In the case of fluorescence, it is the channel on which our objects are. Otherwise, for Brightfield (H-DAB, H&E, ...), the three channels (red, green, and blue) are used.Input annotation(s): Annotations in which our objects of interest are. If you choose a class name within the list, we will only segment the annotations having that class. Otherwise, you have some other choices::: Active annotation: Segment only within the active annotation.:: Full image: Creates a rectangle annotation over the whole image, makes it active, and runs the segmentation.:: All annotations: Will segment the objects within every annotation.Network: The network to use is either CellPose or StarDist.Model: The model that we use for the selected network. The list includes the basic models for this network and the models within the "models" folder in the project's folder. If you have a custom model for StarDist, place it in models/stardist; for CellPose, in models/cellpose.Normalization percentile: If you choose the value α for this setting, the global image normalization will be between (α, 100.0-α).Use cell expansion?: In the case where we segment nuclei without cytoplasm staining, using this option will take each nucleus polygon and expand it on a certain distance to roughly estimate the area of the whole cell.Expansion distance (µm): Distance on which the nuclei polygons will grow to turn them into cytoplasm polygons.Classify results as: Each segmented object will receive your chosen class here. If you leave it blank, the results won't be of any specific class.Create annotations?: It allows us to choose whether we should create annotations or detections.Median cell diameter (µm): This parameter only affects CellPose. You can use the ruler in the viewer's lower-left corner to help estimate this size.Save settings as: Name that will receive the file containing the settings within the project's folder. It must only contain letters, numbers, dashes, and underscores.The launcher will try to access and extract the settings from any cnrs-mri-cia-cpsd.XXX.json file that it will find in the project's directory. Then, it will pass them over to a worker and run it. Here, XXX corresponds to the name that you provided in the Save settings as field. The launcher is shared by both CellPose and StarDist; however, the workers are specialized.
Usually, segmenting your objects is only a fragment of your project. You will certainly want to measure some features in what you segmented, count your objects or anything else. To execute your workflow, you will very likely want to create a script and run it for all the images in your project.
From this point, we consider that you found the correct settings with the settings prompt script.
To integrate the segmentation to your workflow, you can use either workflow.groovy or the following snippet:
CellPose StarDist Deep-learning Segmentation Nuclei Batch GUI Cells